
If you are using CloudStack or OpenStack the default behaviour of live migration is configured as launch & pray it will complete. This can cause – and in practice probably will cause – VMs which have a lot of dirty pages to not complete live-migration at all.
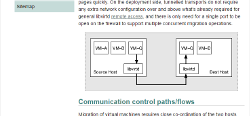
This is caused by the live migration process in libvirt, which basically boils down to transferring all dirty RAM pages of the VM over the network (think of it as a remote sync of the RAM). The Live Migration Process is structured as follows:
Normally if live-migration fails to complete due to some non-trivial error (e.g. configuration on both hosts, different subset of CPU instruction set etc.) it is caused by the iterative pre-copy done in 3. not completing.
No Tuning by Default for Live Migration
By default no tuning is done, e.g. by changing the max downtime or just pausing the VM so that the migration thread could catch up quickly, but you can change settings on both CloudStack and OpenStack or intervene manually on the nodes (normally on the node starting the migration, as that libvirt-thread controls the process).
Of course, you can set a timeout for the migration to complete, but after that timeout is reached the migration is simply canceled. So you first should check the basics, e.g.:
Once you have covered the basics (and yes, of course having a higher network speed helps you get those migrations done (not only faster)), it is time to look deeper. Take note of the domain of the VM (in CloudStack that is the internal name and looks like i-17-91-VM or similar), log on to the host that started the migration and while the migration is still ongoing and issue the following command:
# virsh domjobinfo <domain>
(e.g. virsh domjobinfo i-17-91-VM).
The output should resemble the following:
# virsh domjobinfo i-12-297-VM
Job type:         Unbounded
Time elapsed:     280850       ms
Data processed:   30.904 GiB
Data remaining:   27.963 GiB
Data total:       62.508 GiB
Memory processed: 30.904 GiB
Memory remaining: 27.963 GiB
Memory total:     62.508 GiB
Constant pages:   7355339
Normal pages:     64930658
Normal data:      247.691 GiB
Expected downtime: 30           ms
With newer versions of the libvirt/QEMU/KVM combo, you will see far more data and have much better visibility. Also, compression and caching are implemented which in our labs greatly helps:
# virsh domjobinfo i-17-301-VM
Job type:         Unbounded
Time elapsed:     91164        ms
Data processed:   9.950 GiB
Data remaining:   10.757 GiB
Data total:       32.008 GiB
Memory processed: 9.950 GiB
Memory remaining: 10.757 GiB
Memory total:     32.008 GiB
Memory bandwidth: 110.028 MiB/s
Dirty rate:       0            pages/s
Iteration:        1
Constant pages:   2974365
Normal pages:     2596638
Normal data:      9.905 GiB
Expected downtime: 300          ms
Setup time:       258          ms
Compression cache: 64.000 MiB
Compressed data:  0.000 B
Compressed pages: 0
Compression cache misses: 0
Compression overflows: 0
So our recommendation is to upgrade your libvirt, KVM and QEMU combo to the latest stable versions on your cloud to get maximum efficiency and speed also for live migration tasks.
Over time the Data and Memory remaining numbers should go down and once the numbers reach a certain threshold and the expected downtime is below the maximal downtime value (by the default in KVM/QEMU/Libvirt this is 20ms) the VM will be paused and a last sync of the RAM and status is done to the new host.
After watching the VM for some time you will notice that the live migration is stuck in the iterative pre-copy phase. There are two ways to manually help the migration to complete quickly:
- Pause the VM:
By pausing the VM you effectively help the migration thread to catch up as a paused VM can no longer dirty RAM pages. This causes the VM to freeze (with downtime). - Set a high maximum downtime
Recent versions of libvirt allow for the maximum downtime period to be changed at runtime using the following command:# virsh migrate-setmaxdowntime <domain>
(e.g. virsh migrate-setmaxdowntime i-17-91-VM 250)
Using one of those methods to manually intervene should enable the live migration of high load VMs.
On CloudStack you can set the following parameters in the agent.properties file on the relevant KVM host to have CloudStack take care of this automatically (but I still recommend intervening manually where necessary):
# set the vm migrate speed, by default, it will try to guess the speed of the guest network
# In MegaBytes per second
#vm.migrate.speed=0

# set target downtime at end of livemigration, the 'hiccup' for final copy. Higher numbers
# make livemigration easier, lower numbers may cause migration to never complete. Less than 1
# means hypervisor default (20ms).
#vm.migrate.downtime=0

# Busy VMs may never finish migrating, depending on environment. When its available, we will
# want to add support for autoconvergence migration flag which should fix this. Set an upper
# limit in milliseconds for how long live migration should wait, at which point VM is paused and
# migration will finish quickly.  Less than 1 means disabled.
#vm.migrate.pauseafter=0
In OpenStack you have the option to activate Auto Converge in nova.conf.setting:
nova.conf setting live_migration_flag += VIR_MIGRATE_AUTO_CONVERGE
Useful links:
https://issues.apache.org/jira/browse/CLOUDSTACK-6203
Recent Comments